Showing posts with label format. Show all posts

Monday, April 6, 2020

Pro Tip #5 - File Naming


When you have multiple versions of files in the same folder, the best way to name your file is to use the 
Year/Month/Date_Project Name_Description_Version No.
This always lines up all your files in the folder vs any other file name format, that could mix up the order of your files. 


TIPs when naming your files- 


  • Always use the YYYYMMDD or the YYMMDD format to start your file name.
  • Date followed by Project Name or Client name or Project Number
  • Use short forms/anagrams for big names
  • Overall keep the file name as short as possible.
  • If possible have as much description of the contents in the name
  • Files should be named consistently
  • Avoid special characters (@ # $ *) in a file name.
  • The use of underscore ( _ ) is recommended instead of spaces. 
  • Use Version No to differentiate between files

Examples:
200306_BTS_offline_V1
200306_BTS_offline_V2
200306_BTS_offline_V1A1
200306_BTS_offline_V2A2
200306_BTS_grade_V1
200306_BTS_online_V1

*BTS - Behind the scenes (Project name)
** V1 - Version 1
***V1A1 - Version 1 video with Audio option 1


NOTE:

Ideally, organize different files in separate folders. 
Like a separate folder for all your offlines the same for online or audio etc.


Check out more professional filmmaking tips here

Friday, March 27, 2020

Pro Tip #1 - When sending your resume


When sending your resume use full sentences to look professional.

Do not send emails with nothing or just "PFA" written in the body. Take the effort of writing a good and short cover letter.


Check out more professional filmmaking tips here
For more tips and details read
Pro Tip #2 - When applying for work

How to write a good Cover Letter with your resume

Most recently I had posted a job opening for a continuity supervisor as well as a costume assistant and I was shocked to see the way some of the applicants responded.

In response to my post, there were quite a few emails that came. A few stood out but this one below stood out the most for all the wrong reasons 


Very Bad Email


You definitely want to get noticed but if your effort is anything like the above applicant then the likelihood of you getting the job is as short as your email irrespective of your experience. Your employer's response looking this would be WTF??

Not only do you want to stand out but make a good impression as well. If you can't take the time to write a proper email then don't expect the employer to take the time to go through your resume.

Here are a few points which you should have in your cover letter when sending your resume to anyone.

  1. Subject
  2. Address the person
  3. Reference of the job opening
  4. Highlight your capability
  5. Any other request
  6. Closing
  7. Formatting 
  8. Final tips 

example of a good email


Subject

The subject of the email should always have the following points
a) The job position
b) Your name
c) Project name (if any)

like:- 
PROJECT NAME / POSITION - YOUR NAME
RESUME: NAME - POSITION
Resume for the post of XYZ - YOUR NAME

Remember the person who has posted for the job will have multiple applicants in their inbox. So if your subject line should stand out among the many emails including other work emails that the person receives.

TIP:- Keeping your name at the end sticks out more than at the start of the subject.


Address the person

Hi, Yo, Wassup - these are a big NO-NO even if the person you are sending the email to is your close friend. Adress the person with their name and if you don't know that or the gender use the sir/madam option.

like:-
Dear XYZ,
Dear Sir/Madam,

Always keep it formal as you never know how many people your email could be forwarded to.


Reference of the job opening

Your next line in the email should be a reference of who or where you saw the notification of the job vacancy. If there was no post then a line stating how and where you came across the company and why you are applying to them.

like:-
This is in reference to your post on XYZ
I got your reference from XYZ


One line highlighting your capability

After you have referenced the job position in one line state why the person should consider you.  Keep the line short and highlight your strength towards the position, that generates interest to the employer even before the CV/Showreel is opened. 

like:-
"Having been part of the industry for the last 18 years... " or
"As a hardworking individual.." or
"I think I am suited for this job because.."
"My experience with editing from the last few years..."


Any other request

Any other request from the employer to be mentioned next but only if it asked. These would be questions posted in the job opening. 

like:-
- When can you join?
- How much ctc/salary are you expecting?
- Your experience?
- Special skills
- Please send your showreel/work experience


Closing

This is as important as the beginning. End your email with a short line which says your ready to meet or get on a call/skype anytime. Don't forget to say thanks and in addition to your name do leave your phone no as well so that the employer can easily find it without having to open your CV.


Formatting 

Before you send your email, select all your content and fix the font and size especially if you have copy-pasted anything into the body of the email. This helps keep everything uniform. In fact, you should make this a habit for all the emails you send out as it helps make your email look very professional.


Final tips 


  1. You need to make the effort only once in drafting an email then later you can just adapt that same content and send it to others. So take your time and draft a good one and keep.
  2. If your too lazy to retype the email and hit forward then remember to delete "Fwd" in the subject.
  3. Also when forwarding, remember to fix the employer's name and the reference line.
  4. Remember to update your resume and links if using old email content.
  5. Very Important - Please keep your cover letter as short as possible as no one will look at long emails.
  6. If you have separate links to your work then its better if you make a single playlist (like on youtube) and send only 1 link. No one likes many links listed in one email.
  7. Avoid attaching your showreel videos or heavy files. People could be reading your email on their phones and these may not open. Also, no one has the time to wait for big downloads to see your work. 
  8. There are also chances that your email might bounce if large attachments are made.
  9. DO NOT chase the person for a response, one courtesy check-in after a few days is fine but do not chase your potential employer if you do not get a response.

Check out some other tips when applying for work that you should keep in mind.
Tips when applying for work

All the best in finding your work.

Tuesday, November 24, 2015

How to cut up a video into unequal proportions in After Effects

Recently I was asked to output a video for a large screen projection into 4 unequal parts. Why would anyone need this you may ask? Well these are used for large LED screens for rock / music concerts, auto car shows, trade show etc. Below is the 10 step easy route I used in After Effects to get this done.

The task given was to convert a HD video into 4096 x 1408 size and then cut it up into 4 parts, now if it was a equal division it would be a easier task but have a look at pic 1 below and it should explain why this is complicated process.

Pic 1: Screen Requirements


Step 1: Prepare the video.


Luckily for me, that was a call the client had to take, and they went with crop the top and bottom option. Whatever is the size of the full final resolution, is the size you should prepare your master video and export it. If your master video is only for the giant screen it is ideal that you prepare your output in the full size right from the beginning rather than scale it up later. 


Pic 2: HD image without crop


Pic 3: HD image scaled up to fill up the width

TIP - Prepare the video in the full size required, check if all your shots fit within the screen dimensions and all your supers and effects are within the screen's display. HD does not blow up to this proportion so the choice was 

1. Keep the full HD image but have blank space on either side Pic 2 OR 
2. Fill up the screen and crop top and bottom of the image. Pic 3.

Once you have adjusted your super's and effects and whatever you can do to keep inside the visual area, you export the video ideally in the uncompressed format in the size requested, in this case 4096 x 1408.

You will probably say that you could do the same thing by just applying the scale on the image and then using the video, but I have noticed that sometimes after cropping you may have a one or two pixel problem which will shift your image and that shows up even more on a giant screen. So its safer to use a video where you are only applying the crop and no other effects on it while doing this process.


Step 2: Import the video in After Effects.


Import your uncompressed video, or best resolution video into the project.


Step 3: Create 4 compositions. 


Create 4 compositions, give the names V1 – V4 corresponding the 4 screens, size of each screen to be as requested. (See pic 1) 

Use different bright background colours to help identify each one quicker, also if you have a bright solid colour it will help to identify if there is a gap during the crop process, even if it is for one pixel at the edges, this helps avoid any mistakes.

Keep the pixel ratio to square.

In this case the V1 and V2 will be 2048x1024. (You get that by 1408 - 384 on the height.) and V3 and V4 will be 2048 x 384 (see pic 1 & 4)


Pic 4: V1 to V4 composition settings


Step 4: Place the video in each composition.


Drag your full resolution video in each of the compositions.


Step 5: Re-set the anchor points.


Re-set the anchor point in all compositions to 0,0 that should take the anchor to the top left corner of the image (See pic 5 & 6)


Pic 5: Reset position for V1

Step 6: Re-set the position in each composition. 

Re-set your image positions so that the image occupies the different corner in each composition 

V1 will be 0,0 that takes the entire image to the top left corner. (See Pic 5)
V2 will be -2048, 0 (which is minus half of the total width, since the width is divided into equal parts)
V3 will be 0,-1024 (which is minus top part of the height
V4 will be -2048, -1024 (which is minus half width and top part of the height) [See pic 6]


Pic 6: Reset position for V4
The reason to reset your anchor points and positions is so that the math of dividing the screens is easier and quicker to check, you could do this without resetting any of the points but that would mean that you would need to calculate the difference from the centre of the image to the various corners of the screen required, which trust me is a whole lot of math to get right.


Step 7: Export the 4 cropped videos.

Render out V1 – V4 in the same setting as imports (uncompressed), before you render out please check that the video has been positioned in exact corners of every composition, if the video is not in position you would see the background colour even if its off by 1 pixel. If its off you would need to go back and check your numbers all along the process right from your master export.

Pic 7: 4 parts of the cropped video 

Step 8: Checking the 4 cut videos. 

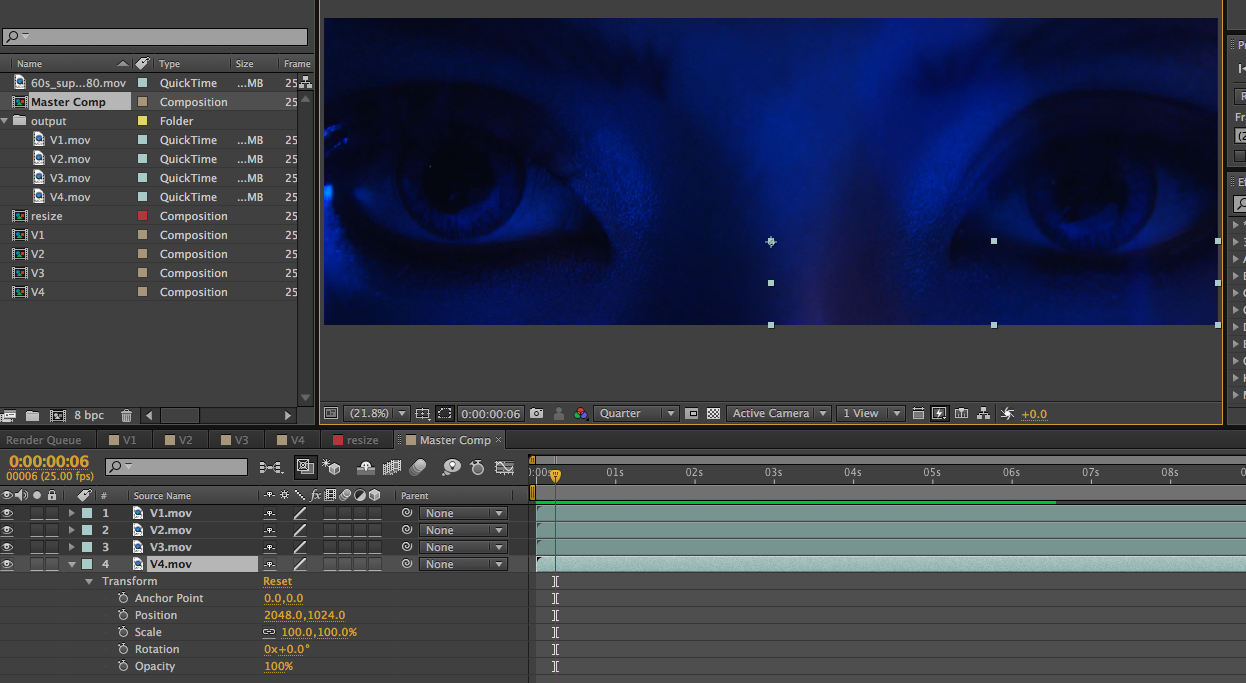
To check if the video has been cut fine, make a master comp of the full size (4096 x 1408 in this case) Import all the cut video exports (V1 - V4) into the master comp, re-set all the anchor points to 0,0 and re-set all the positions for V1 - V4 but without the negative

In this case it will be
V1 will be 0,0
V2 will be 2048,0
V3 will be 0,1024
V4 will be 2048,1024 (See pic 8)


Pic 8: Master comp 


All the videos should align correctly to give a complete picture, even if one pixel is off you will see the dividing line between the 2 images, play the video to check if there are any problems. If there is a problem go back and check all the numbers for each and every export and see if there is a problem there.

Step 9: Convert the video format.


Now you can convert the 4 cropped of videos into what ever format and compression you need, like most large screens require either wmv or mov as outputs. Don't forget audio file needs to be given separately.

Step 10: Check on the giant screen.


Finally if possible check the film on the giant screen to know that it all worked out fine.


For more interesting articles click on Auggielicious Index to see the list, and to be in touch hit Like / Follow on the blog button on the right hand side or hit Like on the Facebook page Auggielicious for information, latest news and events beyond the blog..


Tuesday, May 31, 2011

Panasonic Dimensions 3D film competition

Panasonic Dimensions 3D film competition:-


A 3D competition put together by Panasonic where 7 film schools across India participated in a short duration movie/documentary making contest in 3D, a workshop at Upper Deck @ Lonavala where Barry Braverman (DOP / 3D expert) took everyone through the basics of 3D in quite a depth at the same time introducing Panasonic's AG-3DA1 camera.

Upper Deck - Lonavala

You can check this page for the specs and some basics of the camera and 3D:-
http://pro-av.panasonic.net/en/3d/ag-3da1/index.html


Film schools that participated in this competition were
LV Prasad - Chennai

Chennai Film Industrial School (CFIS) - Chennai

Asian Academy of Film and Television (AAFT) - Delhi

NDTVmi - Delhi

Film and Television Institute of India (FTII) - Pune

Symbiosis Institute of Media and Communication (SIMC) - Pune

Satyajit Ray Film and Television Institute - Kolkata


The entire gang.


In the workshop, Barry not only covered 3D but also looked into storytelling and how one could use 3D to enhance the story by using it. The limitations and the so-called rules or basic principals one could say were also shared during the course of this workshop.  


A bunch of professionals from the industry including me, were asked to act as mentors or creative producers, our responsibility was to make sure that while creativity was given a free hand there were no basics that were overlooked and a check on budgets of course. Nikhil Gonsalves was the chief producer and all teams had to report to him.

The mentors along with Barry and Nikhil.

The fields from which each mentor come are as follows:-
Satyanshu Singh - Scriptwriter
Arjun Venkatesh - Cinematographer
Rohan Talwalkar - Assistant Director
Augustine Fernandes (Auggie) - Director. 
Chirag Patel - Cinematographer / Photographer
Tunali Mukherjee - Photographer / Writer
Kumar Devanshu - Scriptwriter


Over the 3 days, the teams were given a chance to use 3D cameras, so that technical questions mainly because of the medium could be sorted, also limits of the camera and medium were figured. Each team had to work on stories which they had to pitch and only after all the producers were happy were the teams given a green signal for that story to be their 3D film which they would work on following the workshop. While pitching each team had to have back up ideas in case the one pitched failed to make the cut, also they had to come up with a Title, log line (story in one line or something that is memorable from the film), and a poster for the pitch. (This is something that a few directors go through when they try to sell their script to producers or financiers)


Post the workshop teams returned to their colleges and work on their storyboards, location recce, casting, costumes and mainly budgeting, dates were fixed post-budget approvals and this followed by prep and shoot. All teams were given sufficient time and were called in batches for their respective edits at Qlabs in Mumbai, the process involved a basic 2D edit a 3D conform, DI while dubs and sound mix on 5.1 Dolby. The finished films were burnt onto blu ray and were ready for judging.

The judging was done by none other than
Rajkumar Hirani 
Nikhil Advani  and
Karan Johar

So while the winning team got to fly to LA to visit the Panasonic Studios the rest of us took back the fact that we were among the rare few who got to learn and work in a medium that is still in the developing stage. We also got to take back memories along with a whole bunch of new friends from across the country.

You can watch the episodes that were covered by NDTV and which were aired in the links below
(Don't know how long these links will last though.)

Episode 1

Episode 2

Episode 3

Final Episode


For more interesting articles click on Auggielicious Index to see the entire list.
Like / Follow on the Facebook page Auggielicious for information, latest news, job posts etc..


Thursday, July 2, 2009

SCREENPLAY

"Mama always said life was like a box of chocolates. You never know what you're gonna get." - Forrest Gump

SCREENPLAY


So what’s the difference between a script and a screenplay? Well actually not much, a screenplay could be your script but a script is not necessarily your screenplay. A script can be the written text for a play or radio or the basic start (rough draft) for the film. Screenplay on the other hand implies a greater emphasis on the visual aspects of film-making. After you have written your story its time you put it in screenplay format, which also may be called shooting script (at a later stage), if you have the software for it then it's easier as it imports some formats like word directly and converts it into the screenplay format, but if you don’t then here is some rules that make it the standard format, make sure your story is almost locked for henceforward changes can only lead to confusion especially if not followed properly.

BASIC FORMATTING

The font to be used is Courier in 12 point size. The way it's finally structured is usually one page equals one minute of screen time, which means if your screenplay goes up to 120 pages then your film would be 2 hours long. Knowing how long your film is going to be in advance helps in budgeting and also determining if you want a film that is so long or short. There are different things that constitute the screenplay’s layout. It is mainly broken up into two parts action and dialogues. Also part of it is scenes headings, transitions, parentheticals, etc.
Here is an example of a screenplay


SCENE AND PAGE NUMBERING

Now as we see from this example, your screenplay will have page numbers on the top and scenes are assigned numbers alongside the scene headers, a new number is assigned every time there is a new scene which usually when there is a location change or the day has changed. The scene numbers provide a convenient way for the various production departments to reference individual scenes. The page numbers on the top help when there are revisions and the production can replace you with the revised pages, for example pages 5, 7, 12, and 35. So the whole script has not to be reprinted as a new draft. These page numbers have to be locked after the first draft as that becomes the reference point for all departments. If the length of the new pages are longer then it moves into 35A, 35B, or if the scene is deleted and there is no other scene on that page then a fresh page of 35 with OMITTED is given so as to avoid confusion of a missing page at a later stage, the reason for also submitting only these revised pages is to avoid the different departments to rewrite all the handwritten notes all over again in the new draft.
Revision pages are distributed on colored paper, a different color for each set of revisions, with each changed line marked by an asterisk in the right margin of the page. The progression of colors varies from one production house to the next, a standard sequence would be: white, blue, pink, yellow, green, gold, salmon, cherry, white (this time is known as "double white"), and back to blue ("double blue"). Usually, before the start of the filming process, a final draft is given out with all scenes and pages renumbered. The other way to also do it especially if the coloured paper is not easily available is to keep an index at the end of the script and a note made each time the pages go through revision. 

Example
PAGE
DRAFT NO
5
2
7
2
12
3
35
3

It is best that scene and page numbers are maintained throughout because too many changes could lead to some departments missing out or overlooking some of the changes. When a numbered scene is split across pages, (CONTINUED) appears at the bottom of the prior page, and CONTINUED: appears at the top of the subsequent page.
Each new scene is numbered differently so that any part of the script can be referred to by their scene numbers, scenes which are broken up into an edit pattern so that it moves back and forth from locations continue to have the same scene number, like a phone conversation that cuts back and forth to 2 different people at different locations but is still the same scene, for shooting purposes these are sometimes numbered as 7a, 7b, 7c or 7.1, 7.2, 7.3 this usually depends on what is comfortable with the production house and assistant directors.

SCENE TITLES


Scene titles also known as slugs tells the reader that the story has changed in location or time. It tells the reader where and when the action appears and the line comprises three parts:

INT. or EXT. - is the scene an interior or exterior scene?
LOCATION - where does the action take place?
DAY or NIGHT - what is the time of day?

EXAMPLES
  • 11. EXT. MUMBAI MONTAGE – DAY
  • 12. INT. SHARMAS VILLA – NIGHT


ACTION AND DIALOGUES


Action is the part which usually follows the scene title, it is usually written in the present tense. This part tells the reader what is happening in the scene, at times it also includes camera movements, lighting pattern, or costume description, etc, The dialogue are the lines the characters speak. The name of the character is written in all caps followed by the dialogue

EXAMPLE
SHARMA
Mumbai logo ne aaj tak mumbai ko
kya diya..?? meine ye sab diya hai
Mumbai ko. Ye sab mera hai..

When the dialogue is split across more than one page then (MORE) or (CONT'D) appears below the portion of dialogue on the first page, the remaining dialogue is headed by the character's name, which is extended by cont’d e.g. SHARMA (CONT'D). Sometimes the character speaks continuously with action lines splitting the dialogues, for such situations parentheticals can be used in the subsequent speeches. Parentheticals are positioned the same as standard ones, below the character's name and indented from the dialogue. Some writers use (CONT'D) beside the character's name for dialogues that are split between action (the same as for dialogue split across pages). Many writers choose not to indicate consecutive dialogue at all.


There is lot more to know but with this much of knowledge one can easily write your first screenplay. So now that your screenplay is ready just remember one thing, if your story aint’ good, your wasting time on the screenplay’s technicalities is useless.


Auggieism:- What to you say when Auggie is singing his heart out.....
Ans:- crockie..


For more interesting articles click on Auggielicious Index to see the entire list.
Like / Follow on the Facebook page Auggielicious for information, latest news, job posts etc..